How to Change Screen Resolution in Windows 11 (Step-by-Step)
Finding display settings and adjusting screen dimensions in Windows takes just a few clicks. This guide covers how to find your resolution controls, adjust desktop layout scaling, and troubleshoot common monitor detection issues. Not sure which resolution to set? Check the most common screen resolutions in 2026 for market share data by device type.
Check screen resolution in Windows 11
Windows 11 has streamlined the Settings app, making it very easy to find your display specifications. Follow these steps:
- Right-click anywhere on an empty space on your desktop.
- Select Display settings from the context menu.
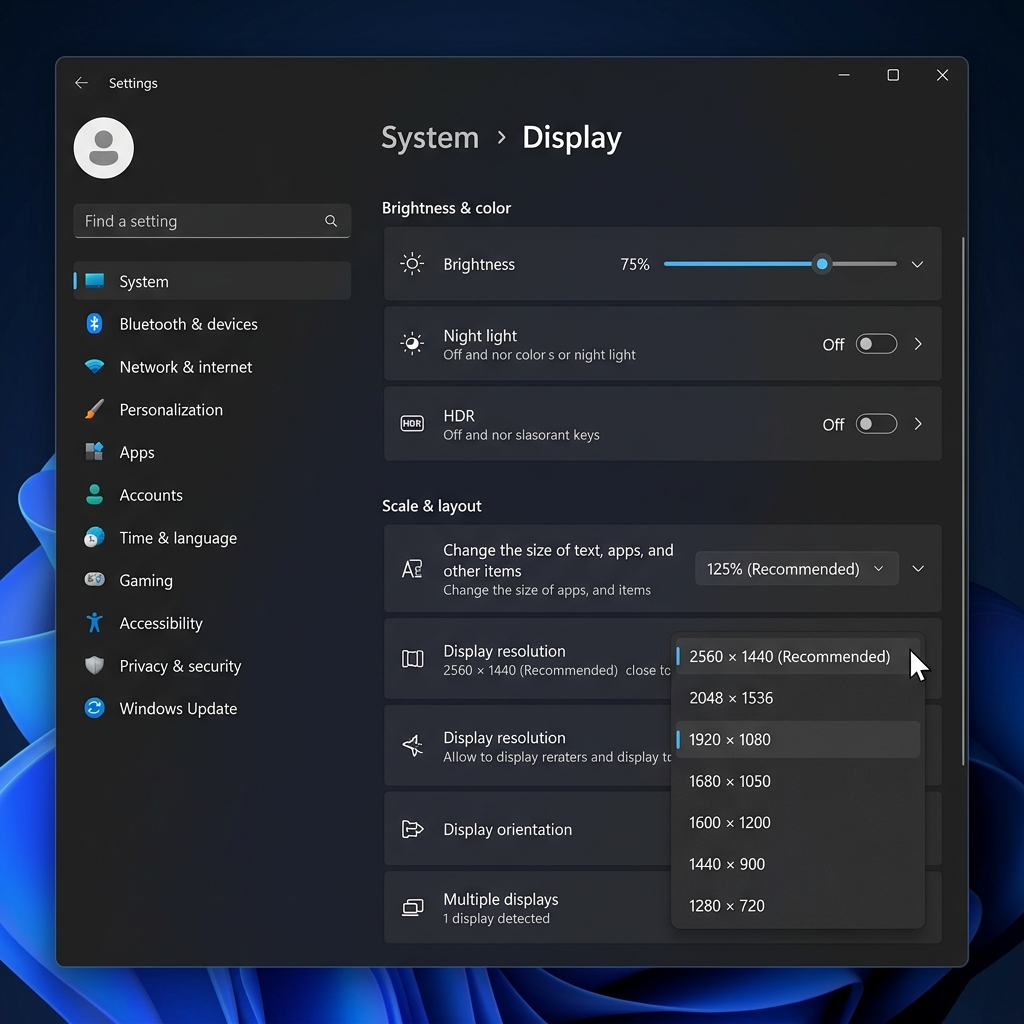
- The Settings window will open. Scroll down to the Scale & layout section.
- Look for the box labeled Display resolution. The numbers shown here (e.g., 1920 x 1080) are your current screen resolution.
- If the box says “(Recommended)” next to the numbers, you are using the optimal native resolution for your monitor.
Check screen resolution in Windows 10
The process on Windows 10 is nearly identical to Windows 11, though the menus look slightly different.
- Right-click on an empty area of your desktop.
- Click on Display settings at the bottom of the menu.
- In the window that opens, scroll down to the Scale and layout section.
- Find the drop-down menu under Display resolution. The value currently selected is your active resolution.
Use the command prompt
If you prefer using the keyboard or need to check the resolution remotely via a script, you can use the Windows Command Prompt (cmd) or PowerShell:
- Press the Windows Key, type
cmd, and hit Enter. - Run the following command:
wmic path Win32_VideoController get CurrentHorizontalResolution,CurrentVerticalResolution
This outputs your exact horizontal and vertical pixel counts directly in the terminal window.
Common Windows display resolutions reference
Windows supports a wide range of monitor resolutions. Here are the most common ones you’ll encounter in Display Settings, along with their industry names and ideal screen sizes:
| Resolution | Name | Aspect Ratio | Best For |
|---|---|---|---|
| 1920 × 1080 | Full HD (1080p) | 16:9 | 24-inch monitors, budget gaming |
| 2560 × 1440 | QHD / Quad HD (1440p) | 16:9 | 27-inch monitors, productivity |
| 3840 × 2160 | Ultra HD / 4K UHD | 16:9 | 32-inch+ monitors, content creation |
| 2560 × 1080 | Ultra-Wide Full HD | 21:9 | Wide-screen, cinematic work |
CSS pixels vs. physical pixels on Windows
When you check your resolution in Display Settings, Windows shows your physical pixel count (the true hardware resolution your monitor contains).
The number that websites and apps use internally is the CSS pixel count. This is calculated by dividing the physical pixels by the Device Pixel Ratio (DPR). On a standard 1080p monitor, the DPR is 1, so CSS pixels equal physical pixels.
On a 4K display at 150% scaling, Windows reports a DPR of 1.5. This means a 3840px screen presents itself to software as 2560px wide.
Color depth (typically 24-bit True Color on modern monitors) stays constant regardless of resolution. This CSS scaling logic is similar to how high-density screens render on a modern mobile device, where virtual CSS pixels ensure layouts remain legible while the hardware panel displays crisp details.
Why is my Windows resolution blurry or grayed out→
Graphics driver issues are the main cause of incorrect or blurry resolutions. They can also grey out the selection menu. Windows is likely using the “Microsoft Basic Display Adapter” fallback driver.
To fix this, you need to update your graphics drivers:
- Go to Settings > Windows Update and check for optional updates.
- Or download the official drivers directly from Nvidia, AMD, or Intel depending on your hardware.
For a complete walkthrough on correcting your resolution once you’ve identified the problem, see our guide to changing screen resolution on Windows and Mac.
DSR and VSR rendering beyond native resolution
Did you know you can run Windows at 4K resolution even if you only own a 1080p monitor→ Both NVIDIA and AMD offer driver-level features to achieve this, known as DSR and VSR, respectively.
These technologies trick Windows and your games into believing a higher-resolution monitor is connected. The GPU renders the image at 4K. It then applies a high-quality downsampling filter to fit your monitor’s native 1080p pixel grid.
This results in incredibly smooth anti-aliasing and can make older games look sharp. You can enable this in the NVIDIA Control Panel or AMD Adrenalin Software.
EDID overrides with custom resolution utility
Sometimes, Windows simply refuses to show your monitor’s native resolution in the display settings. This is almost always caused by a corrupted EDID (Extended Display Identification Data) handshake between the monitor and the GPU.
Power users can bypass Windows restrictions using a free tool called Custom Resolution Utility (CRU). CRU lets you inject custom resolutions directly into the Windows registry. This forces the OS to output your desired pixel count and refresh rate.
Be extremely careful when using CRU. Forcing an unsupported pixel clock will cause an “Out of Range” blank screen. This requires a Safe Mode boot to undo.
The complexities of Windows scaling (DPI)
Since the introduction of 4K monitors, the traditional 1-to-1 pixel mapping in Windows became unusable. A 4K 27-inch monitor makes standard 10-point text microscopic. To fix this, Microsoft introduced DPI (Dots Per Inch) scaling.
When you set Windows scaling to 150%, the system renders text and vector graphics 50% larger to keep fonts crisp.
Legacy Windows apps that lack modern DPI awareness do not scale automatically. Windows stretches these older programs using bitmap scaling, which causes the blurry, fuzzy text often seen in legacy software.
To fix blurry apps, right-click the executable and select Properties. Go to Compatibility, click Change high DPI settings, and check Override high DPI scaling behavior (set to Application).
Set up high refresh rates (144Hz, 240Hz, 360Hz)
A common mistake is buying a high-resolution, high-refresh-rate monitor and forgetting to enable the refresh rate in Windows. By default, Windows 10 and 11 will set any new display to 60Hz to ensure maximum compatibility.
- Open Display Settings and select your monitor.
- Scroll down and click Advanced display.
- Locate the “Choose a refresh rate” dropdown and select the highest available number.
If your monitor advertises 144Hz but the dropdown only goes up to 60Hz, you are likely experiencing a bandwidth limitation. Ensure you are using a DisplayPort cable rather than HDMI, or verify that your laptop’s HDMI port is rated for HDMI 2.0 or higher.
Understanding scaling vs. resolution
Many users confuse display resolution with display scaling. While resolution determines the physical number of pixels used to draw the screen, scaling determines how large text, icons, and UI elements appear within those pixels.
If you have a 4K monitor, running it at its native 3840x2160 resolution will make everything look tiny. Instead of lowering the resolution, Windows uses scaling to enlarge elements. This preserves the crispness of the high-resolution grid.
Gaming at native vs. upscaled resolutions
When playing PC games on Windows, your game resolution can be set independently of your desktop resolution. For the best visual clarity, play games at your monitor’s native resolution.
If your graphics card struggles to maintain a smooth framerate at native 4K or 1440p, you can lower the in-game resolution. Modern upscaling technologies like NVIDIA DLSS, AMD FSR, and Intel XeSS render the game internally at a lower resolution to boost performance, then upscale it to your native resolution.
Advanced display troubleshooting
Standard display settings might not be enough for power users, gamers, or designers. Understanding how Windows handles EDID (Extended Display Identification Data) can save hours of troubleshooting.
When you plug in a monitor, it sends an EDID packet to your graphics card. This packet outlines its supported resolutions, refresh rates, and color spaces. If this handshake fails due to a bad cable, Windows defaults to a safe but blurry resolution like 1024x768 or 800x600.
To fix EDID handshake issues, always try a VESA-certified cable first. If that fails, tools like Custom Resolution Utility (CRU) allow you to override the EDID and force Windows to output your monitor’s native resolution. Be warned: forcing an unsupported resolution can result in a blank screen, requiring you to boot into Safe Mode to reset your display drivers.
Multi-monitor setup considerations
Using multiple monitors with different resolutions is common, but it presents unique challenges. For example, pairing a 4K screen with a 1080p monitor can cause windows to resize erratically as you drag them between displays.
This happens because Windows assigns a different DPI scaling percentage to each screen. To fix this, open Display Settings and adjust the Scale percentage for each monitor until elements look roughly the same physical size.
For the best multi-monitor experience, always plug high-resolution, high-refresh-rate monitors directly into your graphics card (GPU) rather than your motherboard. Motherboard video outputs rely on your CPU’s built-in graphics, which often lack the bandwidth to drive multiple 4K displays at 60Hz or higher.
Frequently asked questions
How do I change screen resolution?
If you need to adjust your resolution, simply open Settings, go to System > Display, and select a new option from the Display Resolution dropdown. For more detailed instructions, see our guide on changing your resolution.